Connecting remote IoT devices securely to a Virtual Private Cloud (VPC) using a Raspberry Pi is a powerful way to enhance your network infrastructure without breaking the bank. In today's digital age, the ability to manage IoT devices remotely is crucial for businesses and hobbyists alike. This article will provide a step-by-step guide on how to securely connect your IoT devices to a VPC using a Raspberry Pi, ensuring optimal performance and security.
As more devices become connected to the internet, the need for secure and efficient communication between them grows exponentially. Whether you're a tech enthusiast looking to expand your home automation system or a professional managing industrial IoT deployments, understanding how to set up a secure connection is vital. This article will walk you through the entire process, from setting up your Raspberry Pi to configuring the VPC.
By the end of this guide, you'll have a solid understanding of the tools, techniques, and best practices required to securely connect your IoT devices to a VPC. You'll also learn how to do it for free, leveraging open-source software and cloud services that won't cost you a dime. Let's dive in!
Read also:Jameliz Unveiling The Rising Star In The Music Industry
Table of Contents
- Introduction to IoT and VPC
- Setting Up Your Raspberry Pi
- Configuring Your VPC
- Establishing a Secure Connection
- Using Free Tools and Software
- Troubleshooting Common Issues
- Best Practices for Security
- Scaling Your IoT Network
- Ensuring Data Privacy
- Conclusion and Next Steps
Introduction to IoT and VPC
The Internet of Things (IoT) has revolutionized the way we interact with technology. From smart homes to industrial automation, IoT devices are transforming industries and improving efficiency. However, managing these devices remotely requires a robust and secure infrastructure. This is where Virtual Private Clouds (VPCs) come into play.
A VPC allows you to create an isolated network environment in the cloud, providing a secure and scalable platform for your IoT devices. By connecting your Raspberry Pi to a VPC, you can centralize the management of your IoT devices, ensuring they remain secure and accessible from anywhere in the world.
Why Use Raspberry Pi?
Raspberry Pi is a versatile, low-cost device that can serve as a gateway for your IoT network. Its compatibility with various operating systems and open-source software makes it an ideal choice for setting up a secure connection to a VPC. Additionally, its small form factor and energy efficiency make it perfect for both home and industrial applications.
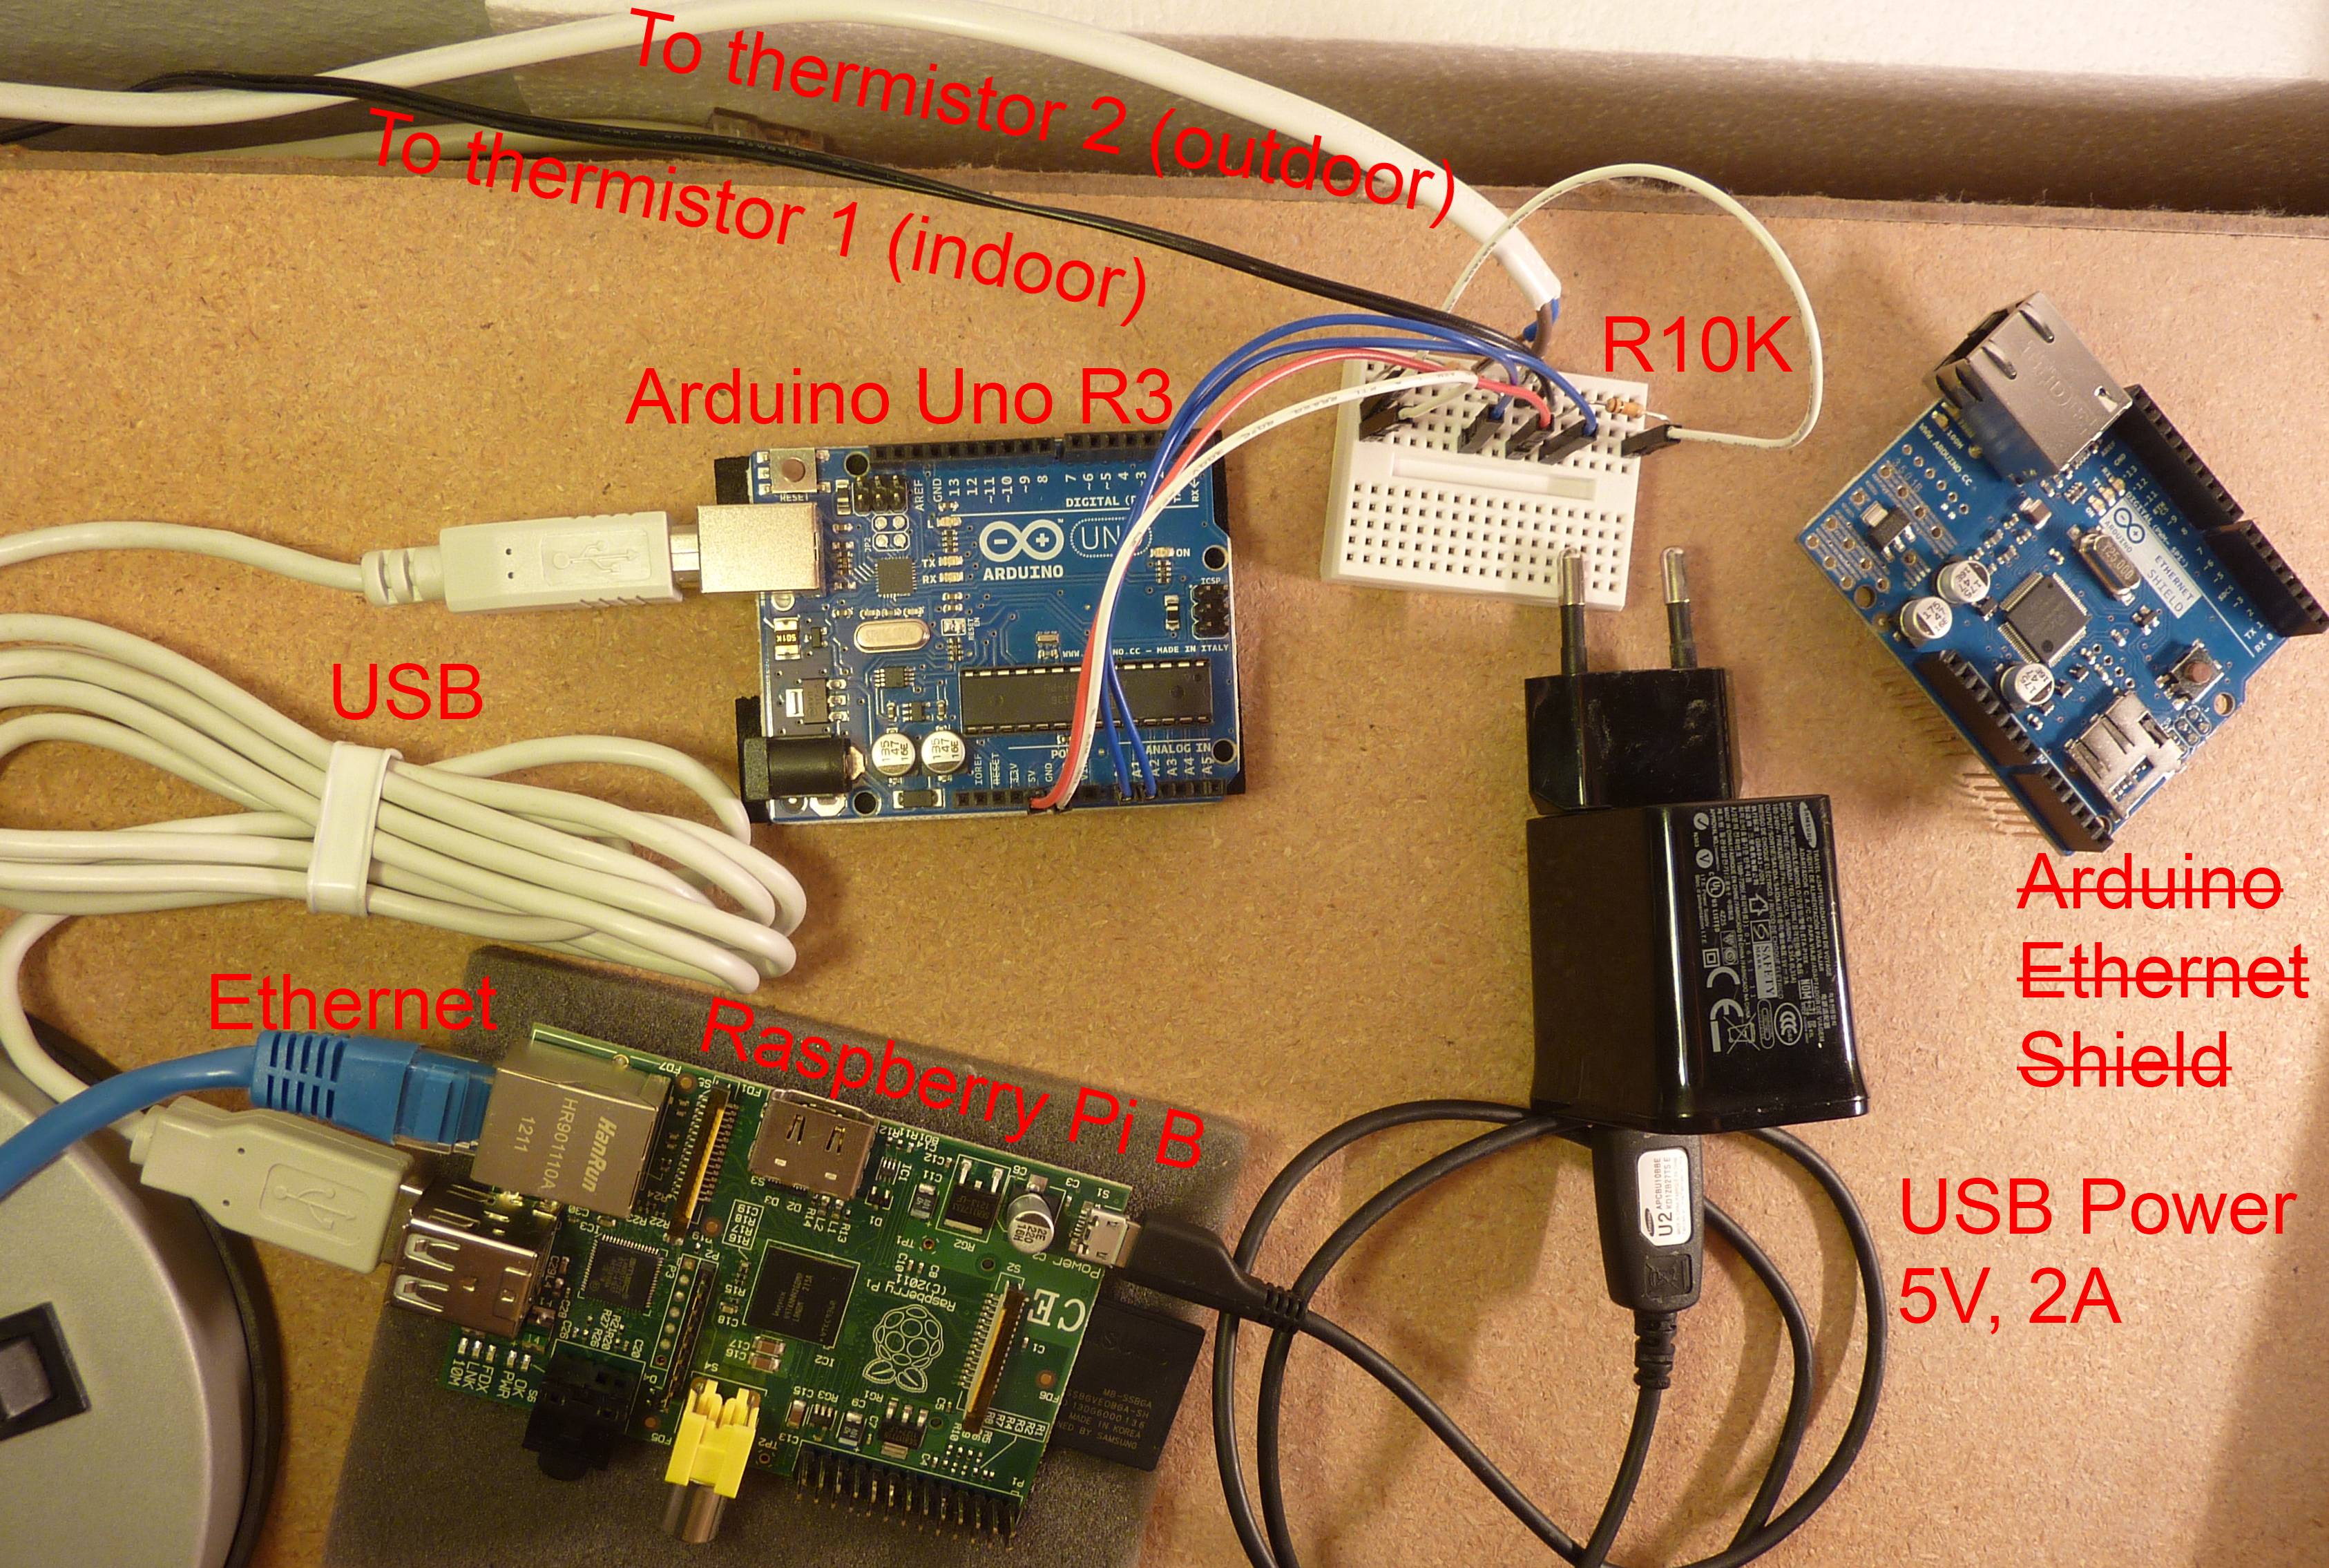
Setting Up Your Raspberry Pi
Before you can securely connect your IoT devices to a VPC, you need to set up your Raspberry Pi. This involves installing an operating system, configuring network settings, and ensuring the device is secure.
Step 1: Install the Operating System
Begin by downloading the Raspberry Pi OS from the official website. Use a tool like Etcher to flash the image onto an SD card. Once the OS is installed, boot up your Raspberry Pi and complete the initial setup process.
Read also:Holly Rowe Son A Deep Dive Into The Life And Legacy
Step 2: Configure Network Settings
Ensure your Raspberry Pi is connected to the internet. You can use either a wired or wireless connection. To configure Wi-Fi, edit the wpa_supplicant.conf file located in the boot partition of the SD card.
Step 3: Secure Your Device
Update your Raspberry Pi's software and change the default password to enhance security. Additionally, consider enabling SSH for remote access and installing a firewall to protect your device from unauthorized access.
Configuring Your VPC
Once your Raspberry Pi is set up, the next step is to configure your VPC. This involves creating a virtual network in the cloud and setting up security groups to control access to your IoT devices.
Step 1: Choose a Cloud Provider
Select a cloud provider that offers free tier services, such as AWS or Google Cloud. These platforms provide the necessary tools to create and manage a VPC without incurring any costs.
Step 2: Create a VPC
Follow the provider's documentation to create a VPC. Define subnets, route tables, and internet gateways to ensure your devices can communicate with the outside world.
Step 3: Set Up Security Groups
Configure security groups to restrict access to your VPC. Only allow traffic from your Raspberry Pi's IP address to ensure maximum security.
Establishing a Secure Connection
With your Raspberry Pi and VPC configured, it's time to establish a secure connection between the two. This involves setting up a VPN or using SSH tunneling to encrypt data transmitted between your devices.
Option 1: Use a VPN
A Virtual Private Network (VPN) creates an encrypted tunnel between your Raspberry Pi and VPC, ensuring all data transmitted is secure. Popular open-source VPN solutions include OpenVPN and WireGuard.
Option 2: SSH Tunneling
SSH tunneling allows you to securely connect to your VPC using the Secure Shell protocol. This method is ideal for lightweight applications and requires minimal configuration.
Using Free Tools and Software
There are numerous free tools and software available to help you securely connect your IoT devices to a VPC. Some popular options include:
- OpenVPN: A widely-used open-source VPN solution.
- WireGuard: A modern, fast, and secure VPN protocol.
- NGINX: A web server that can be used as a reverse proxy for securing IoT communications.
- Docker: A containerization platform that simplifies the deployment of applications on your Raspberry Pi.
Troubleshooting Common Issues
Even with the best planning, issues can arise when setting up a secure connection between your IoT devices and VPC. Below are some common problems and their solutions:
Issue 1: Connectivity Problems
If your Raspberry Pi cannot connect to the VPC, check your network settings and ensure the correct IP addresses are configured. Additionally, verify that the security groups allow traffic from your device.
Issue 2: Security Alerts
If you receive security alerts, review your firewall rules and ensure only necessary ports are open. Regularly update your software to patch any vulnerabilities.
Best Practices for Security
To ensure the security of your IoT network, follow these best practices:
- Regularly update your Raspberry Pi's software and firmware.
- Use strong, unique passwords for all devices and accounts.
- Enable two-factor authentication wherever possible.
- Monitor your network for suspicious activity and take immediate action if any threats are detected.
Scaling Your IoT Network
As your IoT network grows, you may need to scale your infrastructure to accommodate additional devices. This can be achieved by adding more Raspberry Pi gateways or upgrading to more powerful hardware. Additionally, consider using cloud-based services to offload processing tasks and reduce the load on your local devices.
Ensuring Data Privacy
Data privacy is a critical concern when managing IoT devices. To protect sensitive information, encrypt all data transmitted between devices and ensure compliance with relevant regulations, such as GDPR or CCPA. Regularly audit your systems to identify and address any potential privacy issues.
Conclusion and Next Steps
In conclusion, securely connecting remote IoT devices to a VPC using a Raspberry Pi is a cost-effective and efficient way to manage your network. By following the steps outlined in this guide, you can ensure your devices remain secure and accessible from anywhere in the world.
We encourage you to share your thoughts and experiences in the comments section below. If you found this article helpful, consider sharing it with others who may benefit from the information. For more tips and tricks on IoT and networking, explore our other articles on the site.
References: