As the Internet of Things (IoT) continues to expand, securely connecting remote devices has become a critical focus for businesses and individuals alike. With the rise of cloud-based solutions, Virtual Private Clouds (VPCs), and affordable hardware like Raspberry Pi, users can now create robust remote connections that are both secure and scalable. Whether you're setting up a remote IoT network or accessing devices from anywhere in the world, understanding how to securely connect your Raspberry Pi to a VPC is essential. This guide will walk you through the process, including downloading and configuring Raspberry Pi software on Windows for free.
Remote IoT connectivity offers numerous advantages, such as real-time monitoring, data collection, and automation. However, it also introduces security risks that must be addressed. This article will explore the best practices for securely connecting remote IoT devices using a Virtual Private Cloud (VPC) and Raspberry Pi, ensuring your data remains protected.
By the end of this guide, you'll have a comprehensive understanding of how to set up and manage a secure IoT environment, leveraging the power of Raspberry Pi and cloud-based VPC solutions. Let's dive into the details to ensure your remote IoT connections are both secure and efficient.
Read also:Cavinder Twins Nudes Debunking Myths And Understanding The Truth
Table of Contents
- Introduction to Secure IoT Connections
- Overview of Raspberry Pi
- What is a Virtual Private Cloud (VPC)?
- Steps to Securely Connect Remote IoT Devices
- Setting Up Raspberry Pi for IoT
- Configuring a VPC for IoT
- Implementing Security Measures
- Downloading Raspberry Pi Software on Windows
- Common Issues and Troubleshooting
- Conclusion and Next Steps
Introduction to Secure IoT Connections
In today's interconnected world, securely connecting remote IoT devices is more important than ever. The proliferation of smart devices has created new opportunities for innovation but also introduced new challenges, particularly in terms of security. A Virtual Private Cloud (VPC) provides a secure and isolated environment for hosting IoT devices, while Raspberry Pi serves as an affordable and versatile platform for managing these connections.
By combining VPCs with Raspberry Pi, users can create a secure and scalable IoT infrastructure. This setup allows for remote access, data encryption, and robust security protocols, ensuring that sensitive information remains protected. Whether you're a hobbyist or a professional, understanding how to securely connect remote IoT devices is a valuable skill.
Overview of Raspberry Pi
Raspberry Pi is a low-cost, credit-card-sized computer that has revolutionized the world of DIY electronics and IoT projects. It is powered by an ARM processor and comes with various interfaces, making it ideal for a wide range of applications, from home automation to industrial IoT.
Key Features of Raspberry Pi
- Compact and portable design
- Support for multiple operating systems
- Built-in GPIO pins for interfacing with sensors and actuators
- Compatibility with a wide range of software tools and libraries
Raspberry Pi's affordability and flexibility make it an excellent choice for securely connecting remote IoT devices. With the right configuration, it can act as a gateway between your local network and a cloud-based VPC.
What is a Virtual Private Cloud (VPC)?
A Virtual Private Cloud (VPC) is a logically isolated section of a cloud provider's infrastructure. It allows users to create a private network within the cloud, where they can launch resources, such as virtual machines and databases, in a secure and controlled environment.
Read also:Securely Connect Remote Iot Vpc Raspberry Pi Aws Server
VPCs offer several advantages for IoT applications, including:
- Enhanced security through network isolation
- Customizable IP addressing and subnet configurations
- Support for secure communication protocols like SSH and TLS
By leveraging a VPC, you can ensure that your IoT devices are protected from unauthorized access while maintaining seamless connectivity.
Steps to Securely Connect Remote IoT Devices
Connecting remote IoT devices securely involves several key steps. Below is a high-level overview of the process:
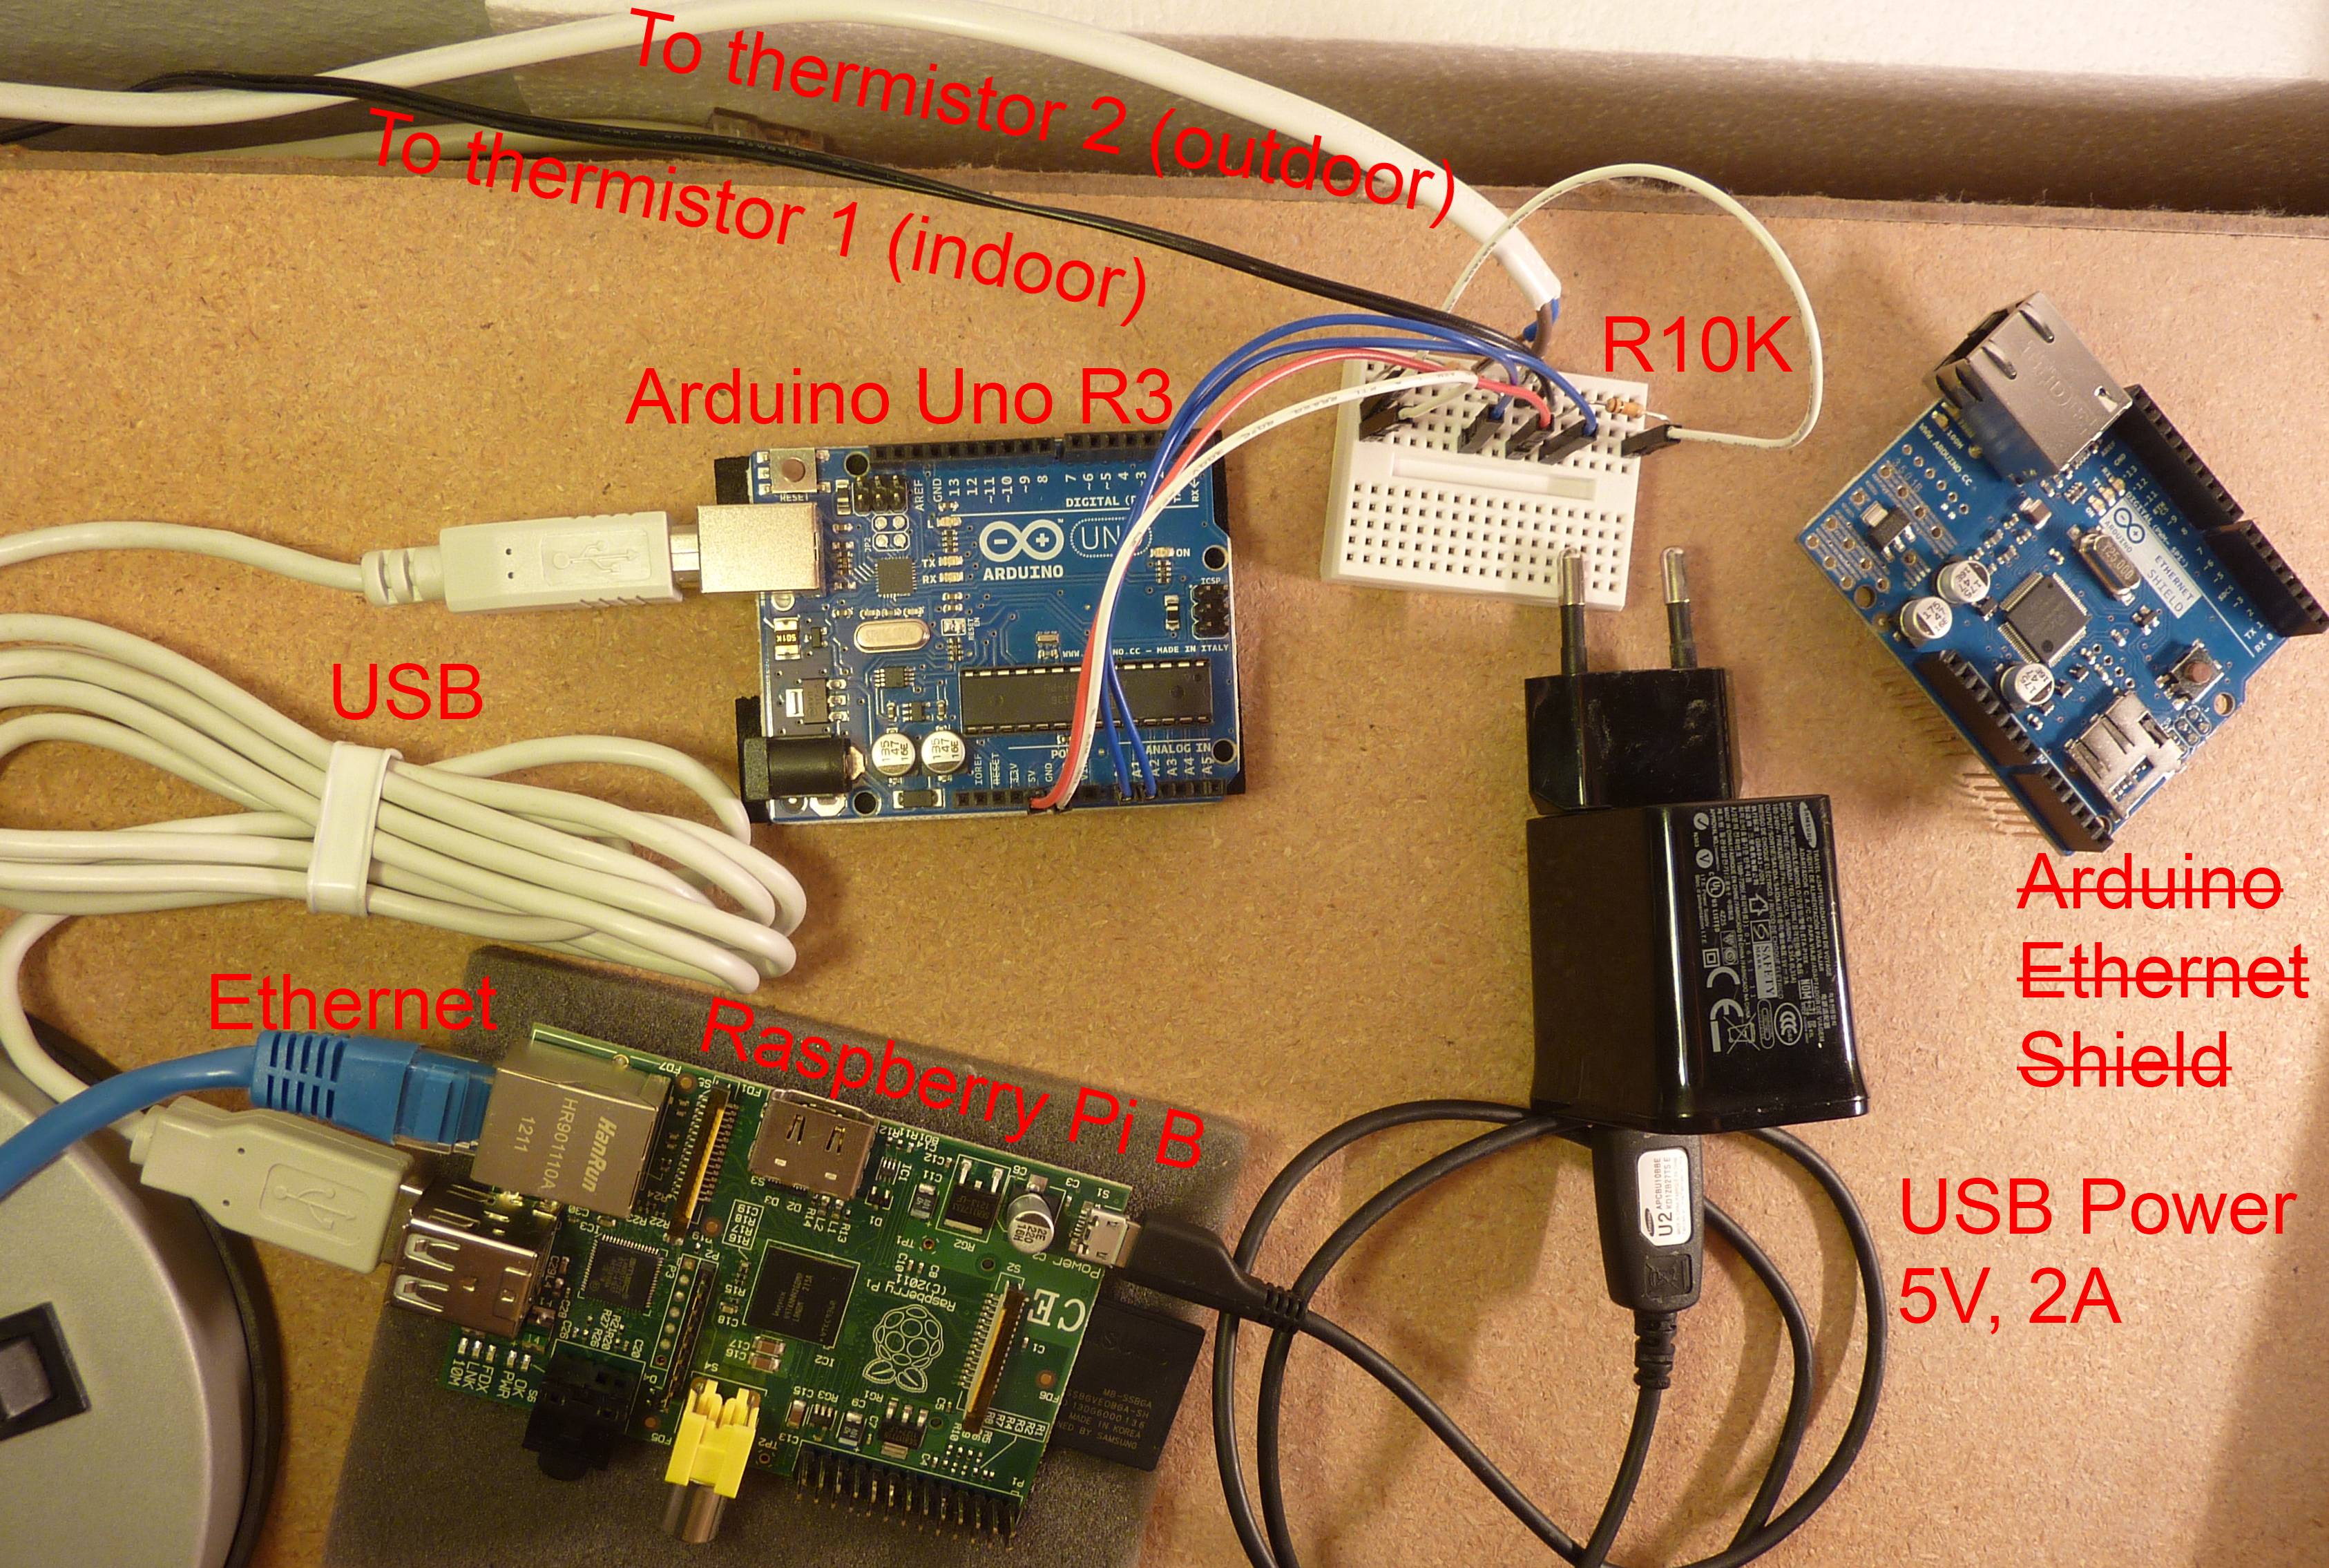
Step 1: Set Up Your Raspberry Pi
Begin by installing the appropriate operating system on your Raspberry Pi. Popular choices include Raspberry Pi OS and Ubuntu Server. Ensure that your Raspberry Pi is properly configured with the necessary drivers and libraries for your IoT application.
Step 2: Configure Network Settings
Configure your Raspberry Pi's network settings to connect to your local Wi-Fi or Ethernet network. Use static IP addresses to ensure consistent connectivity.
Step 3: Establish a Secure Connection to the VPC
Use a secure protocol like SSH or TLS to establish a connection between your Raspberry Pi and the VPC. This ensures that all data transmitted between the devices is encrypted and protected from eavesdropping.
Setting Up Raspberry Pi for IoT
Setting up Raspberry Pi for IoT applications involves several key steps. Below is a detailed guide to help you get started:
Step 1: Download Raspberry Pi OS
Visit the official Raspberry Pi website and download the latest version of Raspberry Pi OS. Choose the lightweight version if you're planning to use the device primarily for IoT applications.
Step 2: Flash the Image to an SD Card
Use a tool like BalenaEtcher to flash the Raspberry Pi OS image to an SD card. Insert the SD card into your Raspberry Pi and power it on.
Step 3: Configure Wi-Fi and SSH
Create a file named "wpa_supplicant.conf" on the boot partition of the SD card to configure Wi-Fi settings. Additionally, create an empty file named "ssh" to enable the SSH server.
Configuring a VPC for IoT
Configuring a VPC for IoT involves setting up a secure and isolated network environment. Below are the key steps:
Step 1: Create a VPC in Your Cloud Provider
Log in to your cloud provider's console and create a new VPC. Define the IP address range and subnet configurations based on your requirements.
Step 2: Launch an IoT Gateway Instance
Launch an instance within the VPC that will act as the IoT gateway. This instance should be configured with the necessary software to communicate with your Raspberry Pi devices.
Step 3: Set Up Security Groups
Create security groups to control inbound and outbound traffic to your VPC. Ensure that only authorized devices and services can access the network.
Implementing Security Measures
Securing your IoT environment is critical to protecting sensitive data. Below are some best practices for implementing security measures:
1. Use Strong Authentication
Implement multi-factor authentication (MFA) to ensure that only authorized users can access your IoT devices and VPC.
2. Encrypt Data in Transit
Use secure communication protocols like TLS to encrypt data transmitted between your Raspberry Pi and the VPC.
3. Regularly Update Software
Keep your Raspberry Pi and VPC software up to date with the latest security patches and updates.
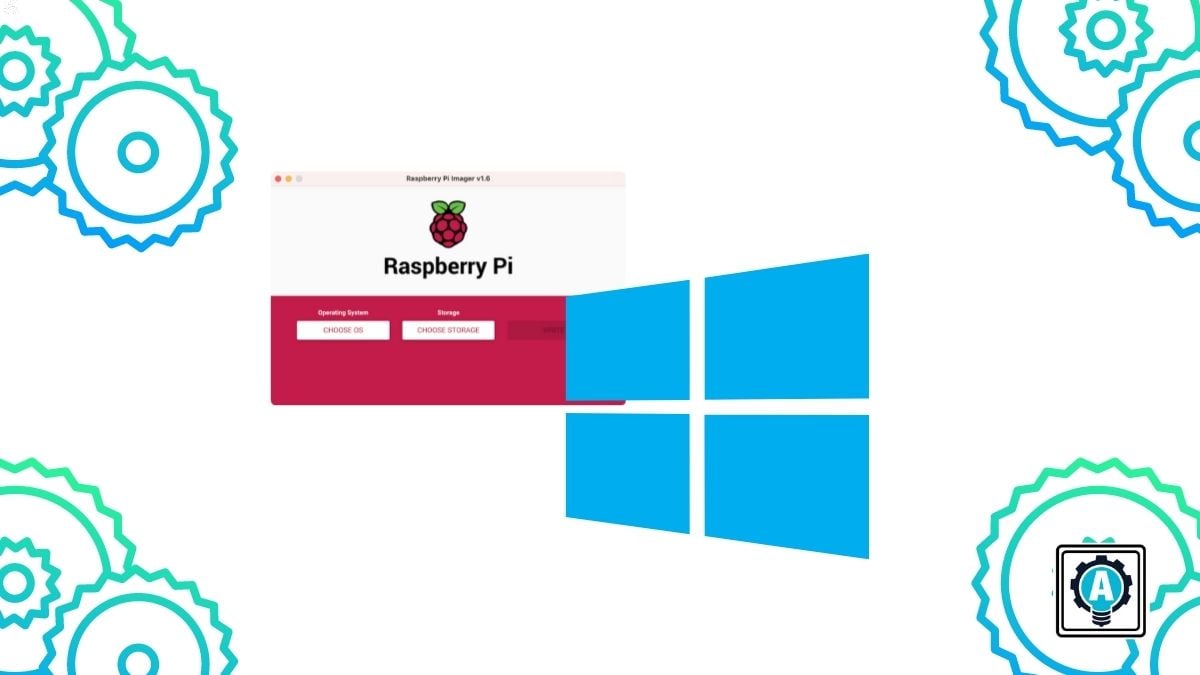
Downloading Raspberry Pi Software on Windows
Downloading and installing Raspberry Pi software on Windows is a straightforward process. Follow these steps to get started:
Step 1: Visit the Official Website
Go to the official Raspberry Pi website and navigate to the downloads section. Download the Raspberry Pi Imager tool, which simplifies the process of writing the OS image to an SD card.
Step 2: Install the Raspberry Pi Imager
Run the installer and follow the on-screen instructions to install the Raspberry Pi Imager on your Windows machine.
Step 3: Write the Image to an SD Card
Insert an SD card into your computer and launch the Raspberry Pi Imager. Select the desired OS and choose the SD card as the target device. Click "Write" to begin the process.
Common Issues and Troubleshooting
While setting up your Raspberry Pi and VPC, you may encounter some common issues. Below are some troubleshooting tips:
Issue 1: Unable to Connect to Wi-Fi
Ensure that your "wpa_supplicant.conf" file is correctly configured with the appropriate SSID and password. Restart your Raspberry Pi after making changes to the file.
Issue 2: SSH Not Working
Verify that the SSH service is enabled by checking for the presence of the "ssh" file on the boot partition. Additionally, ensure that your firewall rules allow SSH traffic.
Conclusion and Next Steps
Securing remote IoT connections using a Virtual Private Cloud (VPC) and Raspberry Pi is a powerful way to protect your data and ensure seamless connectivity. By following the steps outlined in this guide, you can create a robust and secure IoT infrastructure that meets your needs.
We encourage you to experiment with different configurations and explore the wide range of possibilities offered by Raspberry Pi and cloud-based solutions. Don't forget to share your experiences and insights in the comments below. For more information on IoT security and best practices, check out our other articles on the site.
References: